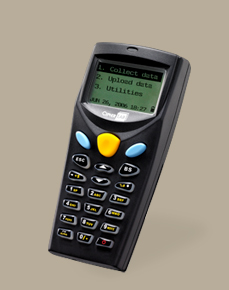
Cipherlab 8000 Batch Scanner
User’s Guide
The Cipherlab 8000 mobile batch scanner offers integration for taking physical inventory counts within ExtremePOS, Musicware, and Praiz. This guide contains instructions on setting up and using your Cipherlab 8000 Batch Scanner or Scanners.
IF YOU HAVE MULTIPLE SCANNERS IN A SINGLE STORE, YOU MUST SET THEM UP TO RUN THROUGH A SINGLE STATION. YOU WILL USE ONE CRADLE FOR ALL SCANNERS. BEFORE SETUP CONTACT EXTREMEPOS SUPPORT FOR THE SYSTEM FILES NEEDED FOR USING THE CIPHERLAB WITH YOUR SYSTEM.
Initial Setup:
First, you should run the Generic USB Com Port installation. This may be found on the CD that came with your scanner, or downloaded from the ExtremePOS website from the link found on the hardware page.
Once that is done, plug in a USB cradle device. Windows should detect the device and install it.
Once this is installed, you must set settings in three places: Device manager, ExtremePOS, and the scanner units.
To get to device manager, in Windows go to Start -> Control Panel. In Windows XP, go to System, then the hardware tab, and you will see the button to launch device manager (If in category view, System is found under Performance and Maintenance). In Windows Vista, you may go directly to Device Manager.
Once in Device Manager, go to ports. You are looking for the USB to UART Bridge port. (For example, Silicon Labs CP210x USB to UART Bridge) In parenthesis after this will be the port number, for instance, COM4. Right click on this device and select properties.
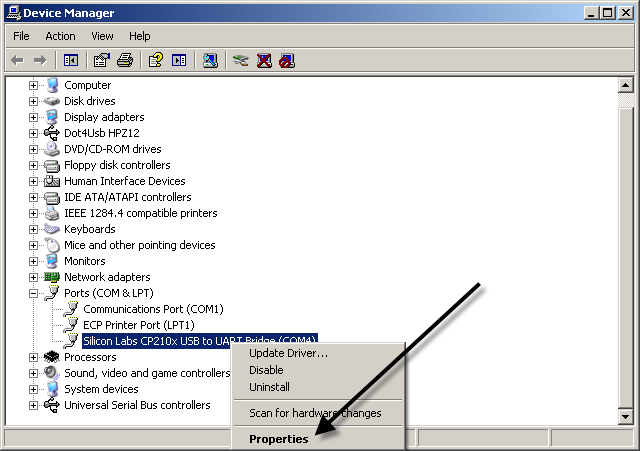
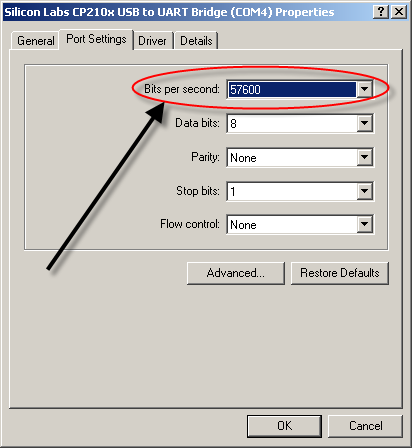
In properties, go to the port settings tab, and look for the box marked Bits per Second. All devices must be set to use the same bits per second rate; we recommend setting this to 57600. Once you have set it, you may press okay and exit Device Manager.
Launch ExtremePOS/Musicware/Praiz, and log in. Go to tools -> options from the main invoice screen. On the printers and hardware page, you should see in the lower left settings for the Cipherlab 8000 series. Set the com port to the one noted earlier (for instance, if it were COM4, set the com port to 4) and the speed to the same speed as your port is set in device manager. Press update to save these settings, and exit ExtremePOS.
Finally, on each scanner, go through the menus as listed below. The blue buttons near the top may be used as enter; to back up, press the ESC button located directly below the left blue button.
3. Utilities
1. Settings
3. Baud Rate
Here, select the baud rate that you have set in ExtremePOS and Windows. (Again, our recommended rate is 57600) Press either of the blue buttons to save the setting.
Scanning Inventory:
Important: You will select whether a batch is comprised of new or used items at time of import into the system. Unless you are using new/used prefixes on your barcodes, you must capture new inventory and used inventory in separate batches.
On the scanner, select “Collect” from the power on menu. This will take you into scanning mode. Pressing and holding the orange button at the top center of the scanner will activate the scan. Use this to scan the articles. After each scan, you will need to enter the quantity scanned; if you wish to take the default of 1, simply hit one of the blue buttons, otherwise enter the quantity using the number keys and then hit the blue button.
You may exit scan mode by pressing the ESC key to return to the main menu; from this menu, you may see a count of the number of items scanned by looking in the lower righthand corner. We recommend importing into the system at least every 1000 items.
Importing Batches into ExtremePOS:
1. You must have a desktop physical inventory count started before importing any batches. This can be found from the login screen, in the tools menu, under physical inventory -> desktop. For detailed information on this process, consult the user’s manual.
2. Importing a batch has the same effect as if you had scanned all of the items into the count inventory screen. You may use as many or few batches as you need to do a single inventory.
3. Items that were not in inventory or were not in the inventoried departments and categories at the time the inventory count was started will not be counted (as is also true for the normal counting procedure). After each batch, the InvError.txt file in the shared files directory will contain a list of invalid items in the most recent batch.
4. All batches should be imported at the same station. Normal counting may be done at any or all stations. Multiple scanners can share the same cradle unit.
In order to import a batch, first, from the main menu on the scanner, select upload. The device should show “Connecting: Press ESC to cancel”. Place it in the cradle, then, from the physical inventory screen, press the “Import from Remote Device” button.
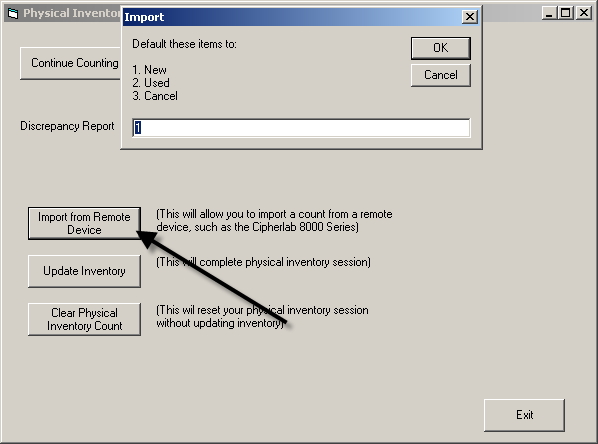
This will bring up the box allowing you to select whether this is a primarily new or used batch. If you are using barcodes with new or used prefixes, those will override this default. Once you select this, the computer will attempt to import the batch from the scanner.
Similarly, you may bring batches in for receiving or building a purchase order, or for building a vendor return. This works identically to importing a batch within inventory, other than that the button for importing appears on the purchase order screen or vendor return screen.